

At Kodable, we've been thinking about how schools will continue to foster collaboration and creativity in the new age of remote learning. Remote learning in elementary school has its own set of challenges.
So when I came across Shannon McClintock Miller's Virtual Makerspace, I had a lot of questions. It's thrilling to see the innovation happening in classrooms all around the country. Ms. Miller was kind enough to answer my questions over Zoom.
About Our Guest
Ms. Miller is the District Teacher Librarian and the Innovation Director of Library and Technology at Van Meter Community School in Van Meter, Iowa. She works with all 950 students Pre-K through 12th grade. Ms. Miller also serves as the Future Ready Librarian spokesperson, and works with the Alliance of Excellent Education in Washington, D C.
Traveling to help other teachers and librarians across the country and around the world has provided new perspectives she enjoys bringing back to her students.
"I get to hear and learn a lot of things that are happening outside of Van Meter. It is really helpful and brings a lot of great opportunities to our school too," says Ms. Miller.
Where did you get the idea for a virtual makerspace?
I have been using choice boards for some time, because kids can be in charge of their own learning and direction. A choice board is anything where kids have a choice on where they want to go. It could be research, to code something, to go outside, or to make something in the sand, etc.
"When I think about remote learning, I want to encourage the different interests and abilities of kids."
When I think about remote learning, I want to encourage the different interests and abilities of kids. Giving students choice is helpful when there's not a teacher directing them or for remote learning with a parent who is working. Choice boards are successful for our little ones all the way up to our older students too.
A lot of what we're going to do at Van Meter is focused around choice boards because at any given time, if we had to be at home again. It would be easy for kids to think creatively and to be able to collaborate with the information available from anywhere.
I also think about summer break, spring break, or winter break and sending things home with kids. The virtual makerspace is similar, but with a bigger scope.
What is your mission with the makerspace?
I hope students feel like they have something that they can contribute and that they can tie into what they're passionate about. I love that piece of makerspaces. As artist myself, I remember how I felt when I was in sixth grade and my art teacher said to me, “Oh, you're so good at art.” I felt that I finally found my niche. I think that's what a makerspace can give kids.
"I hope my students find their niche and then they can take it from there."
It doesn't matter if kids are interested in drawing. If they're interested in coding. If they're interested in building or baking. I’m giving them choice of what they want to learn. I hope my students find their niche and then they can take it from there.
What skills does a makerspace provide your students?
When it comes to technology, there are some necessities we want our students to have experience with: We want our kids to be able to use coding sites. We want them to have experience with robotics. We want them to experience 3D printing. We're adopting new computer science standards as well. I want to make sure that our kids also have these experiences to open up their eyes to a lot of different things that they could do in the future.
What tools did you use to build it?
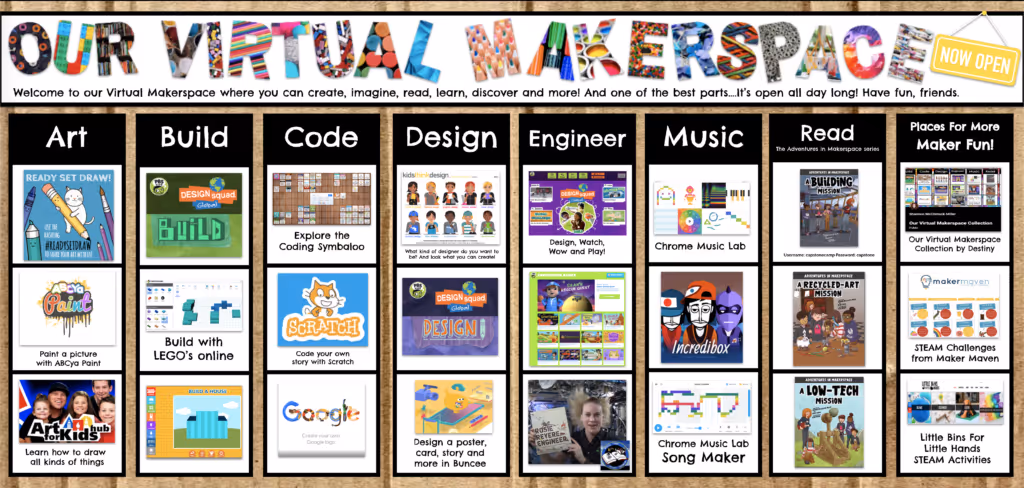
I have the entire Makerspace set up on just a Google Slide. Google Slides make it easy to publish and look like a website and make it really interactive. I like making them in Buncee as well, but the thing that I really like about making them in Google Slides is when you publish it, there's no access to outside sites. Students can't click on anything else to take them outside of the directed pages.
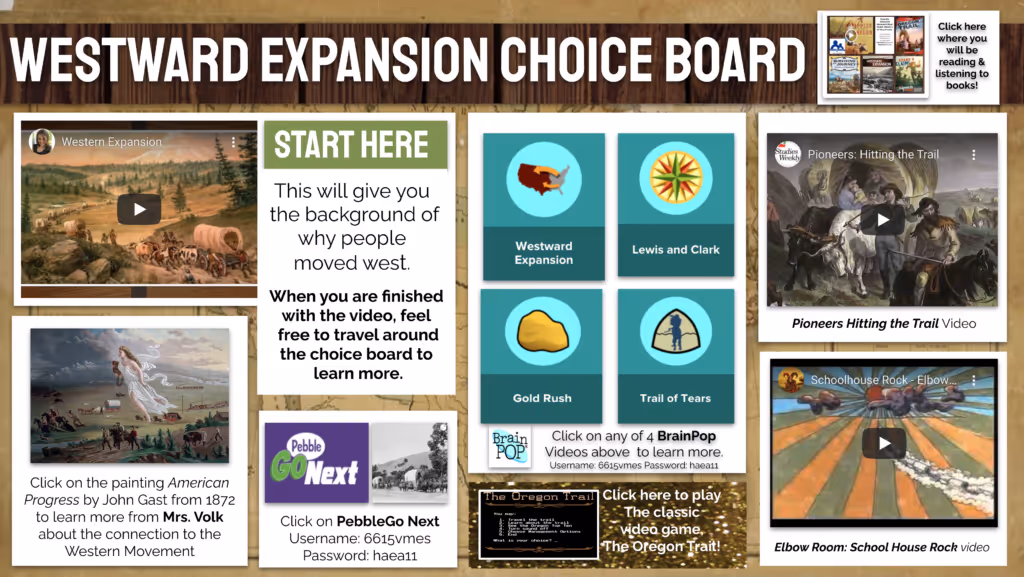
Your makerspace could be as many pages as you wanted it to be and serve as a website, as long as you direct them back to the main page. I made about the westward expansion to use with our third graders. It's really directed while also giving them choice.
How did you decide what to include in your virtual makerspace?
A lot of the activities tie into making, but I also included different opportunities for the students. A lot of our teachers do STEM activities in the classroom, so I wanted to add a mix of things that they're familiar with, but also giving them some different opportunities for new things too. The books that are under the read column are actually books that I wrote. The kids are used to those.
The great thing about any choice board is you can make changes at any time, so it doesn't have to stay the same. That's what I try to do in the makerspace in real life. You wouldn't want to get everything out at once because it would defeat the purpose of them digging in and exploring with something. And so Changing things out is what’s really nice about choice boards. If something doesn't work or maybe there's a special event or theme you're exploring you can put it in there as a special feature.
Do activities in your makerspace require parent or adult assistance?
Kids could definitely find enough that could keep them busy for a while by themselves. Most of the activities do not require a parent. For example the PBS kids activities don't even require a username and password. Sites like that are really nice because the kids could explore by themselves.
Most of our kids have used Scratch, for example, so they would be comfortable logging in without a parent. In the “More Maker Fun” section I did include some links that an older student could explore by themselves. But if a parent wanted to do a STEAM challenge every week or an activity for their younger child, those would be good places to go too.
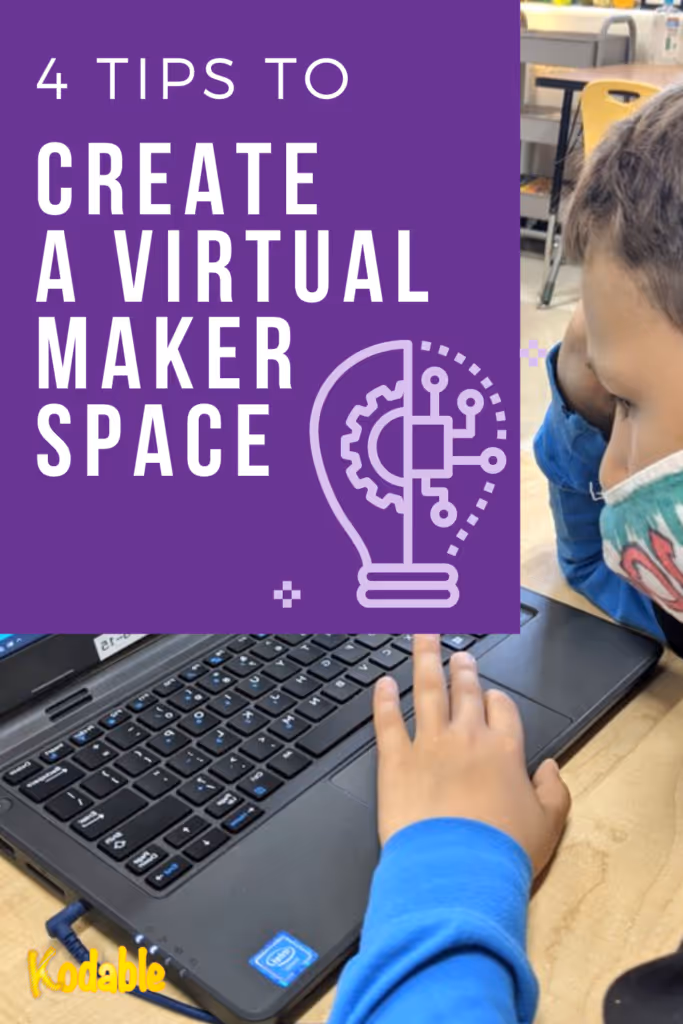
4 Tips to set up your first virtual makerspace:
- Include things that kids are familiar with and some new things. You probably know if your class is interested in drawing, or if they love building. Find some of the things that they are already interested in, but then build skills you've introduced with activities they can explore by themselves. In coding, for example, I know that lots of our teachers use our coding choice board within their classroom, so I pull a couple out each month and replace them with different activities.
- Keep it fresh! You don't want to have too many things but, it is important to rotate things in and out to keep it fun and interactive.
- Think about the way that it's organized, and try to make it easy to understand. If kids understand the goal behind what they're doing, they can go to the places that interest them. For example, if the goal is to music or reading or building, they can choose an activity that is within that category and might be new to them.
- The most important thing is to listen to your kids. If you listen to the things that they're interested in, then you can tie into some of those things in an interesting way.
Are you going back to school in person or continuing with remote learning?
As of right now, we are planning to go back to school on August 17th. Students and teachers will be in the classroom, and won't be traveling throughout the building. They'll have lunch in their classroom and the related arts will come to them. I will be bringing books to them since they won't be coming to the library. It's going to look a little bit different.
We still want them learning and creating and collaborating, but we're going to need some things that keep them calmer than we’re used to in the makerspace. So using the virtual makerspace, even when we go back to school, will be useful in small groups or individually.
Thanks for reading our interview with Ms. Miller. Are you working on your own virtual classroom? Share your ideas in the comments below!
